by W.A. SteerĀĀPhD
![]()
by W.A. SteerĀĀPhD
| Back to contents | About... |
![]()
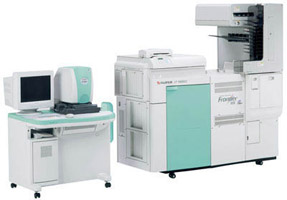
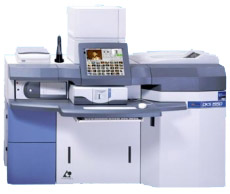
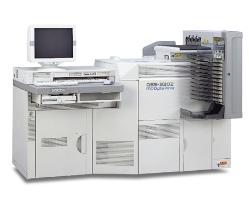
Following the rapid take-up of digital cameras and digital photography, consumer in-store and online digital photo printing services have become widely available. This page will explain how to get the best out of these services, and how to avoid some common problems.
 |  |  |
 |
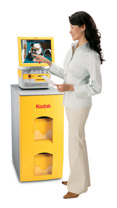 |
Be aware that as well as true photographic prints, many shops and malls feature stand-alone kiosks offering while-you-wait prints which you collect from a slot in the front of the kiosk. There is often no minimum-order, but these machines use a thermal printer technology which is inferior to proper photographic prints, and usually works out more expensive. |
| Stand-alone kiosks with integrated thermal printer | ||
 |  |  |
By default most consumer printing services enlarge the image so that the paper is filled. If cropping is a regular problem then the easiest solution is to choose a print-size which better matches the shape of the pictures your camera takes (for 4:3 ratio images, 7×5" prints are a reasonable match). Otherwise you can usually ask for pictures to be printed with borders (choose black or white bars at top/bottom or left/right) so you see the whole picture. Finally of course you can crop the image yourself, either in the image file itself before you take it to the shop or upload, or using the shop/website do-it-yourself console.
Finally, even if you do supply an image in exactly the correct ratio (eg 3000×2000 pixels for a 6×4" print), the resulting print typically still does not show the extreme edges of your digital file. This is because the consumer has been conditioned to expect prints which "bleed" off the very edge of the paper. To allow some mechanical alignment tolerance and avoid thin black or white bands at the edge of the print, the image is actually scaled to between 1% and 5% larger than the physical paper for printing (meaning there's typically around 1/8th inch or 3mm of image missing off the edges of the print).
Other manufacturers' printers may use a different resolution, or (as in the Kodak/PhotoMe DKS series) use different resolutions depending on the print size.
If you're critical, for the sharpest possible prints, realistically* you should aim for source images with at least 50% more pixels horizontally and vertically than the calculated number of print-pixels. However, unless you have a very, very good reason, do not 'resize' images before taking them for printing. Every resizing of a pixel-based image degrades its quality (some software is worse than others) and you're best off allowing the printer to do the one-and-only scaling between your original and the printed paper, rather than adding additional scaling steps.
The only exception to my no-resizing rule would be if your original pictures are so huge they're really stretching your storage space, and have several times more pixel-count than you need. In that case, downsize them to about 50% bigger than the printer resolution (i.e. number of pixels in each dimension about 450× to 500× the print-size in inches - the exact amount is not critical). It is rarely worth upscaling an image for making a big print - let the lab do it.
* In consumer/high-street printing services, because of the automatic scaling to fit the digital image to the paper format, and the 1%-5% enlargement to bleed off the edge, you will not (in practice) be able to match your image perfectly to the printer resolution. Believe me, I've tried! If you try, your image will invariably get scaled by just a few pixels, with a patchy loss of sharpness equivalent to halving the image-resolution. It's not worth the trouble!
| The effective resolution of the human eye, for a person with normal ('20/20') vision, is equivalent to approximately 300dpi at a "reading" distance of about 14 inches (35cm). Since the visual acuity (resolving power) of the eye is defined by the anglular size of detail projected on the retina, the "equivalent dpi" resolution decreases in inverse proportion to the distance of the object. Double the viewing distance and only half the dpi print-resolution is required. | Ink-jet printers usually boast thousands of dpi resolution (3200dpi / 4800dpi etc), but need to use many pixels which are individually either 'on' or 'off' to reproduce colours of varying density by a process of half-toning. Consequently their effective-resolution for full-colour images is only 300 to 600dpi. Photographic printing processes reproduce continuous-tone images natively, so a single '300dpi' pixel by itself can reproduce any desired colour or density. |
At the very minimum, you should set your monitor to "sRGB" and/or adjust the Colour Temperature (also known as the white point) to "6500K". Using my greyscale test (see link) you should adjust your monitor brightness and contrast until you can see all 17 greylevels distinctly, with black as a good black, "10" being just barely visible above black, and the "f0" just noticeably less bright than the white. You should do this under the lighting conditions in which you normally work - not in direct sunlight! Be aware that the tones and colours on an LCD screen may change as you adjust your viewing-angle, particularly as you move up and down - be sure to sit in your usual position while making adjustments.
Monitor-alignment greyscale test - from my LCD monitor section
Ideally the greyscale will remain colour-neutral from black through to white, although in practice very slight greeny or steely-blue tints are not uncommon. It is possible, but unlikely, that your monitor has adjustment for this.
Mobile/laptop screens: to achieve longer battery life for a given display brightness most mobile/laptop display screens have less saturated colours than sRGB desktop monitors and consequently will be less suitable for colour-critical work.
[Insert link to a greyscale test image to download]
Get a print of the greyscale and see how it comes out.
If there is an objectionable overall colour-cast or the whites saturate early (i.e. several of the light greys all come out the same white) then give up and find another retailer!
If the greyscale is good, start comparing the known-good images to your screen. They should be quite close. If there's a systematic difference, you may be able to slightly adjust the brightness /contrast settings on your monitor to improve the match.
[Add another test image - Quick colour triangle? Fine lines/text???]
Many photo-processing labs will apply either manual or automatic adjustment (or 'optimisation') to your images before printing, while others will simply print all images 'as is'. Better labs give you the choice. Properly exposed or prepared images should need very little optimisation to make good prints, but be aware that if adjustments are being made you won't be able to predict exactly how an image turns out.
A print will look darker if put in a light frame surround, and lighter if put in a dark frame. If your print is hung on a wall and illuminated with a spotlight for display, it will appear lighter (less contrasty) than if just illuminated by the ambient light. This is particularly noticeable for high-contrast black-and-white prints. You may even find that a particular black-and-white image, when reproduced at a large size needs to be reproduced at a higher contrast than a 6×4" print to look "right"!
It can be useful to be aware of these effects, though you normally only need to worry about them as your photography becomes more advanced...
Proceed to Digital Photo Printing - a technical assessment...
©2007 William Andrew Steer