
by W.A. SteerĀĀPhD
by W.A. SteerĀĀPhD
| Back to contents | About... |
This page documents how to configure a Raspberry Pi to act as a USB mobile-broadband-dongle to RJ45 ethernet 'adapter'. This enables mobile-based broadband to feed the 'WAN' port of a commodity home NAT router and then be shared within the home in exactly the same way as an ADSL or cable-based internet connection.
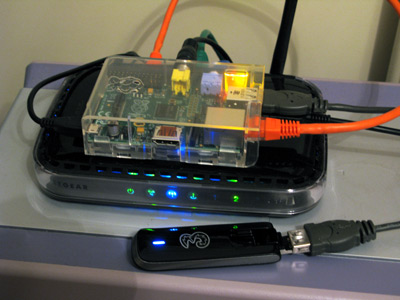
In the absence of a wired broadband connection, it is useful to be able to use a mobile-broadband dongle with a conventional home router to enable the internet connection to be shared between multiple devices (including over WiFi), and for those devices to 'see' each other. Dedicated "mobile broadband" routers into which a 3G/USB dongle can be plugged have been available (e.g. Netgear MBR624G / MBRN3000), but generally only accept a subset of (obsolete) dongles - and are expensive as they are a limited-market product. Having recently upgraded to a new Huawei E3256 HiLink mobile-broadband dongle, I set about configuring a Raspberry Pi as a USB-3G-dongle to RJ45 ethernet 'adapter', which could then feed the 'WAN' port of a commodity home NAT router.
This write-up will start from the very beginning. It assumes you have a Raspberry Pi, a power supply for it, some kind of a monitor to connect to the Pi, an existing internet connection on an RJ45 ethernet cable (for setting up), and a Huawei 'HiLink' mobile-broadband dongle. If you have an older non-HiLink dongle then most of this still applies, but you'll have to seek some additional information on the use of Sakis3G from elsewhere.
The Rasperry Pi is a small, cheap ($30) computer which runs Linux.
The configuration we require comprises 3 main steps:
Start by downloading the latest Raspbian "Wheezy" SD-card image from here: http://www.raspberrypi.org/downloads
The SD card image you want is: 2013-02-09-wheezy-raspbian.zip or a later version.
Assuming your main computer is Windows-based, you'll also need to download the Win32DiskImager linked from the same page.
The Win32DiskImager is a bit minimalist and quirky, but does the job.
Use Win32DiskImager to write the Raspian image to your 4GB or greater SD card.
Note that this will irrecoverably overwrite anything that was previously on the SD card!
After some Linux-like boot stuff, you should be greeted by the Raspberry Pi config screen:
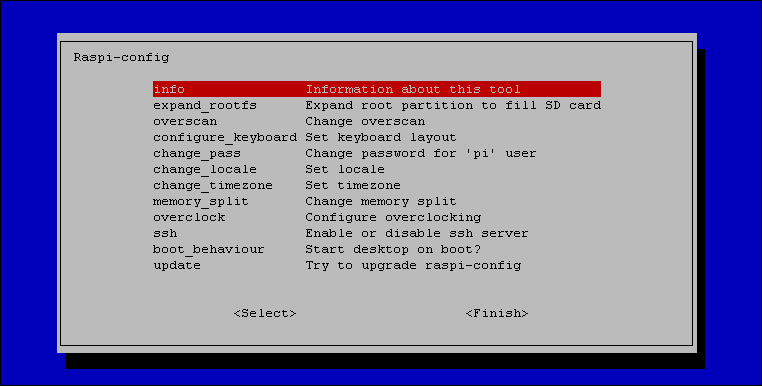
Normally you'd want to use the option to expand the SD card to all the space at this point, however this may
complicate backing up the SD card image and restoring it to other cards. If at the moment your main use of the
Pi is as a router, then don't use the expand SD-card image option for now. Exit the config screen when you're done.
If you're using a composite-video TV/monitor then the display may be fairly small/hard to read and you
might want to take a side-track to sort that out before proceeding much further...
Username: pi
Password: raspberry
Like a PC, you shouldn't just switch off the Pi. You're liable to get SD-card corruption if you just
switch off by pulling the power.
Shut down the Pi gracefully by typing:
sudo poweroff
and wait a few seconds for it to shut down, the screen to go blank, and all the LEDs except the red one
on the Pi to go off. Then unplug the 5V power-supply/charger.
To re-run the config program at any time in future, type:
sudo raspi-config
To reboot the Pi from the command-line, type:
sudo reboot
When working with a good composite (standard-definition) TV monitor, as opposed to an HDMI monitor, the following changes to the config.txt file in \boot (or visible when you plug the SD card into a PC) will make the display a little more readable. Note this is optimised for the PAL system used in the UK; the overscan params suit my Swann monitor, your mileage may vary. Positive overscan values shrink the image relative to the TV frame, negative numbers grow it (relative to some arbitrary overscan-enabled nominal).
# WAS additions 2013 / TV out, UK PAL, Swann monitor
sdtv_mode=2      # 2 - PAL / 0 - NTSC
sdtv_aspect=1     # 4:3
disable_overscan=0   # use overscan (i.e. shrink the image); params below

overscan_left=0   # use -18 for NTSC
overscan_right=-22  # use -14 for NTSC
overscan_top=-24
overscan_bottom=-22 # use -22 (-24 loses bottom cursor!)

framebuffer_width=600   # this is useable for console; try 800x600 for GUI
framebuffer_height=400
For some general background and other lessons, see http://learn.adafruit.com/category/raspberry-pi
Assuming you've got an already-working ethernet router with another computer, then it will likely be much easier to do the customisation of the Pi configuration via a SSH (secure-shell / telnet-like) connection than from the Pi's own keyboard. If nothing else, this allows you to copy-and-paste commands from this web page into the Pi, eliminating the possibility of typing errors!
If you don't already have an SSH client on your PC, then download puTTY from here: http://www.chiark.greenend.org.uk/~sgtatham/putty/download.html You just need the "latest release version" of putty.exe.
When you boot the Pi, at the end of the boot sequence just before the Username login prompt, it tells you its IP address. On this release of the R-Pi OS, SSH appears to be enabled by default - if not then re-run raspi-config.
Point your SSH client (PuTTY) to the IP address stated by your Pi ... and you're in. Log in as pi / raspberry.
Although having SSH makes following the instructions on this page much easier (and allows cut'n'paste), realistically you will still need a monitor and keyboard connected to the Pi while performing the setup described. Not least so you can see what happens if/when ethernet is reconfigured!
Early Pi's had very limited power on the USB ports and required the use of a powered USB hub; new Pi's (since the end of 2012, the ones with two large mounting-holes in the PCB) have removed some of the current-limiting components on the USB connectors and can now supply adequate power for a USB 3G modem - provided your main power supply is up to the job. Although a powered hub might be useful if you have problems, with any luck it won't be necessary.
Huawei dongles - multi-function / multi-personality USB devices. Present themselves to the system into which you plug them as variously (read-only) CD-ROM device (typically for the Windows installer), an SD or micro-SD card reader, and a modem or network-adapter device. In the Linux community you will read much about USB modeswitching - which is about pursuading the device to swap from one personality to the other so we can use the bit we want.
Older generation Huawei 3G mobile-broadband dongles were interfaced as modem-like devices - and even
supported an AT command-set! For these you have to explicity run a short script to initialise a
connection by dialling a (pseudo) number etc.
The latest Huawei dongles have 'HiLink' - which means that they connect to the mobile-network
automatically when powered-up/plugged-in, present themselves over USB as a 'network' interface device
(rather than a 'modem') ... and even have their own mini-web-server to provide a 'web interface' status
page etc. One drawback of the new HiLink interface is that its IP address is (as far as we know) fixed -
at 192.168.1.1 (for many of their modems - some models may vary). If you already have home-networks using
the 192.168.1.nnn subnet, then this is likely to cause problems. Of course you can normally reconfigure
your other routers to use a different subnet, but this is a bit annoying. Bear this in mind as we progress
with the setup.
I believe HiLink modems can be operated in legacy (non-HiLink, modem-) mode, but that's beyond the scope of this page.
This section is largely based on the information I found at http://www.raspberrypi.org/phpBB3/viewtopic.php?f=36&t=18996&sid=fd21abe4b5b72ef03ee162e7ed540675
(Note that because we're using a HiLink modem, we can bypass many steps which you may read about elsewhere)
The following commands can either be entered directly from a keyboard attached to the Pi, or via SSH (which is easier for cutting a pasting more complicated lines).
lsusb
to show connected USB devices.
pi@raspberrypi ~ $ lsusb
Bus 001 Device 002: ID 0424:9512 Standard Microsystems Corp.
Bus 001 Device 001: ID 1d6b:0002 Linux Foundation 2.0 root hub
Bus 001 Device 003: ID 0424:ec00 Standard Microsystems Corp.
Bus 001 Device 007: ID 12d1:1f01 Huawei Technologies Co., Ltd.
Bus 001 Device 004: ID 05e3:0608 Genesys Logic, Inc. USB-2.0 4-Port HUB
Bus 001 Device 005: ID 1c4f:0026 SiGma Micro
Bus 001 Device 006: ID 046d:c05b Logitech, Inc. M-U0004 810-001317 [B110 Optical USB Mouse]
pi@raspberrypi ~ $
Note that the Huawei modem is shown with device ID 12d1:1f01 - which corresponds to its "CD-ROM" personality (not the "network-adapter" personality).
(Note it may be possible to make the next steps somehow just using the usb-modeswitch package, however the s3G-utils solution below works - and apparently s3G includes the usb-modeswitch package anyway)
Next install the s3g-utils package... enter
sudo apt-get install sg3-utils
(note that your Pi needs access to a working internet connection via its ethernet connection at this point)
You will see output something like this:
pi@raspberrypi ~ $ sudo apt-get install sg3-utils
Reading package lists... Done
Building dependency tree
Reading state information... Done
The following NEW packages will be installed:
  sg3-utils
0 upgraded, 1 newly installed, 0 to remove and 0 not upgraded.
Need to get 662 kB of archives.
After this operation, 1,590 kB of additional disk space will be used.
Get:1 http://mirrordirector.raspbian.org/raspbian/ wheezy/main sg3-utils armhf 1.33-1 [662 kB]
Fetched 662 kB in 1s (396 kB/s)
Selecting previously unselected package sg3-utils.
(Reading database ... 59216 files and directories currently installed.)
Unpacking sg3-utils (from .../sg3-utils_1.33-1_armhf.deb) ...
Processing triggers for man-db ...
Setting up sg3-utils (1.33-1) ...
pi@raspberrypi ~ $
Now reboot the Pi.
After logging in, try
lsusb
pi@raspberrypi ~ $ lsusb
Bus 001 Device 002: ID 0424:9512 Standard Microsystems Corp.
Bus 001 Device 001: ID 1d6b:0002 Linux Foundation 2.0 root hub
Bus 001 Device 003: ID 0424:ec00 Standard Microsystems Corp.
Bus 001 Device 004: ID 12d1:14db Huawei Technologies Co., Ltd.
Bus 001 Device 005: ID 05e3:0608 Genesys Logic, Inc. USB-2.0 4-Port HUB
Bus 001 Device 006: ID 046d:c05b Logitech, Inc. M-U0004 810-001317 [B110 Optical USB Mouse]
pi@raspberrypi ~ $
If you now see a 12d1:14db device (the 'network adapter' personality) then we're good to go. But most probably you will need to enter
sudo /usr/bin/sg_raw /dev/sr0 11 06 20 00 00 00 00 00 01 00
to mode-switch the device.
This should give a positive response of the form:
SCSI Status: Good

Sense Information:
sense buffer empty
Repeat the lsusb to verify the mode has switched.
Next try
ifconfig -a
and see if an eth1 device has appeared. If it has, then temporarily configure it with an IP address on the same subnet as the inherent Huawei system (which is 192.168.1.1 for the E3256), so
sudo ifconfig eth1 192.168.1.47
...should do the trick.
Type ifconfig -a again to check if the new IP address has stuck. With any luck you can then ping the Huawei... and get a response
pi@raspberrypi ~ $ ping 192.168.1.1
PING 192.168.1.1 (192.168.1.1) 56(84) bytes of data.
64 bytes from 192.168.1.1: icmp_req=1 ttl=64 time=2.88 ms
64 bytes from 192.168.1.1: icmp_req=2 ttl=64 time=1.08 ms
64 bytes from 192.168.1.1: icmp_req=3 ttl=64 time=1.09 ms
^C
--- 192.168.1.1 ping statistics ---
3 packets transmitted, 3 received, 0% packet loss, time 2003ms
rtt min/avg/max/mdev = 1.089/1.688/2.884/0.845 ms
Assuming the above temporary-test worked, you next need to make the configuration more 'permanent'. This involves making both the modeswitching step permanent, and configuring the network interface.
Firstly the modeswitching:
To automate the mode switch, create a new file /etc/udev/rules.d/10-Huawei.rules
sudo nano /etc/udev/rules.d/10-Huawei.rules
and paste in the following content:
SUBSYSTEMS=="usb", ATTRS{modalias}=="usb:v12D1p1F01*", SYMLINK+="hwcdrom", RUN+="/usr/bin/sg_raw /dev/hwcdrom 11 06 20 00 00 00 00 00 01 00"
and if you're retyping this rather than copy-and-pasting it, note that the brackets around modalias are curly-braces!
Save the modified file (ctrl+O, enter, then ctrl+X to quit the editor),
Next customise the /etc/network/interfaces configuration file:
sudo nano /etc/network/interfaces
and paste in, at the end of the file,
allow-hotplug eth1
iface eth1 inet dhcp
Save the modified file (ctrl+O, enter, then ctrl+X to quit the editor).
Now reboot the Pi with a
sudo reboot
Following the reboot, the Pi should now say "My IP address is xxx.xxx.xx.xx 192.168.1.100", where xxx.xxx.xx.xx = the IP address assigned by your setup to the RJ45 ethernet socket, and 192.168.1.100 is the address assigned to the Pi on the Huawei pseudo 'network adapter'.
If there's any problems, then check the interface adapters using lsusb
If you now unplug any RJ45 network that was plugged into the Pi (eg for SSHing in) and reboot the Pi using
the keyboard, and log in using the keyboard... (if you don't unplug the ethernet, the Pi may try to contact the
internet via that route)
You should be able to ping your favorite webserver eg bbc.co.uk and get a response. Congrats - your Pi is
connecting to the internet over your Huawei HiLink dongle. (If you ran startx you could use a webbrowser in there)
We're now well on the way with this project!
So to make the Pi work as a standalone router, there's a bit more config to do. Essentially we need to make it act as a DHCP server (so it allocates an IP address to whatever it's ethernet port is plugged in to) and to route traffic between the dongle and its ethernet port.
Essentially we're following a variation on the method given here: http://bigcowpi.blogspot.co.uk/2013/03/raspberry-pi-as-3g-huawei-e303-wireless.html which describes a project to turn the Pi into a freestanding 3G-modem-based WiFi hotspot.
However this page: http://qcktech.blogspot.co.uk/2012/08/raspberry-pi-as-router.html seems clearer and more informative in some respects, although their project is using the Pi as a wireless router (creating a wireless-LAN using a WiFi USB dongle) served with internet from the ethernet socket ... so they're sending the traffic the other way. My guide below is essentially a hybrid of these two resources.
There's also similar steps at http://itsacleanmachine.blogspot.co.uk/2012/11/raspberry-router.html
If you started with a default Pi installation, and followed these instructions so far, your
/etc/network/interfaces will currently look something like this
auto lo

iface lo inet loopback
iface eth0 inet dhcp

allow-hotplug eth1
iface eth1 inet dhcp


allow-hotplug wlan0
iface wlan0 inet manual
wpa-roam /etc/wpa_supplicant/wpa_supplicant.conf
iface default inet dhcp
In this configuration, eth0, which is the Pi's ethernet socket, is configured to receive an IP address from the DHCP server on whatever it is connected to.
Going forward however, we want to give the ethernet port a static (LAN) IP address and make the Pi run a DHCP server on that port. This allows the Pi to take charge when it is connected via an RJ45 ethernet cable either directly to a PC or to the WAN-side of a domestic router.
Before making the changes, which may at least temporarily lock us out of conveniently SSHing in, download and install
the DHCP server package using:
sudo apt-get install isc-dhcp-server
Actually, before that worked, I had to run sudo apt-get update
Then it worked...
pi@raspberrypi ~ $ sudo apt-get install isc-dhcp-server
Reading package lists... Done
Building dependency tree
Reading state information... Done
The following extra packages will be installed:
  isc-dhcp-client isc-dhcp-common
Suggested packages:
  resolvconf avahi-autoipd isc-dhcp-server-ldap
The following NEW packages will be installed:
  isc-dhcp-server
The following packages will be upgraded:
  isc-dhcp-client isc-dhcp-common
2 upgraded, 1 newly installed, 0 to remove and 161 not upgraded.
Need to get 2,433 kB of archives.
After this operation, 1,876 kB of additional disk space will be used.
Do you want to continue [Y/n]? Y
Get:1 http://mirrordirector.raspbian.org/raspbian/ wheezy/main isc-dhcp-client armhf 4.2.2.dfsg.1-5+deb70u3 [743 kB]
Get:2 http://mirrordirector.raspbian.org/raspbian/ wheezy/main isc-dhcp-common armhf 4.2.2.dfsg.1-5+deb70u3 [804 kB]
Get:3 http://mirrordirector.raspbian.org/raspbian/ wheezy/main isc-dhcp-server armhf 4.2.2.dfsg.1-5+deb70u3 [886 kB]
Fetched 2,433 kB in 7s (330 kB/s)
Preconfiguring packages ...
(Reading database ... 59387 files and directories currently installed.)
Preparing to replace isc-dhcp-client 4.2.2.dfsg.1-5+deb70u2 (using .../isc-dhcp-client_4.2.2.dfsg.1-5+deb70u3_armhf.deb) ...
Unpacking replacement isc-dhcp-client ...
Preparing to replace isc-dhcp-common 4.2.2.dfsg.1-5+deb70u2 (using .../isc-dhcp-common_4.2.2.dfsg.1-5+deb70u3_armhf.deb) ...
Unpacking replacement isc-dhcp-common ...
Selecting previously unselected package isc-dhcp-server.
Unpacking isc-dhcp-server (from .../isc-dhcp-server_4.2.2.dfsg.1-5+deb70u3_armhf.deb) ...
Processing triggers for man-db ...
Setting up isc-dhcp-common (4.2.2.dfsg.1-5+deb70u3) ...
Setting up isc-dhcp-client (4.2.2.dfsg.1-5+deb70u3) ...
Installing new version of config file /etc/dhcp/dhclient.conf ...
Setting up isc-dhcp-server (4.2.2.dfsg.1-5+deb70u3) ...
Generating /etc/default/isc-dhcp-server...
[FAIL] Starting ISC DHCP server: dhcpd[....] check syslog for diagnostics. ... failed!
 failed!
invoke-rc.d: initscript isc-dhcp-server, action "start" failed.
(don't worry about the final FAIL for now)
This will now have installed a template dhcp configuration file, which we now need to customise:
sudo nano /etc/dhcp/dhcpd.conf
authoritative;

#WAS 20130403 inserted block for my DHCP server...
subnet 192.168.50.0 netmask 255.255.255.0 {
range 192.168.50.10 192.168.50.250;
option broadcast-address 192.168.50.255;
option routers 192.168.50.1;
default-lease-time 43200;
max-lease-time 172800;
option domain-name "local";
option domain-name-servers 8.8.8.8, 8.8.4.4; #Google DNS
interface eth0;
}
Note also that I've extended the default and maximum DHCP lease times to well-above the 600second (10-minute) default. You can read up about tuning lease-times elsewhere, but setting them too short may cause network hiccups especially with streaming connections such as Skype!
And restart the DHCP server sudo /etc/init.d/isc-dhcp-server restart
Actually you probably need to have set the network interface up first, to avoid errors!
sudo nano /etc/network/interfaces
Again we're using the same 192.168.50.xxx address space - as set up in the DHCP section above.
auto lo
iface lo inet loopback

# ETH0 is the RJ45 Ethernet socket. We now want to give this a static IP
# (and run a DHCP server on it - note that the DHCP server is setup elsewhere)
#auto eth0
iface eth0 inet static
address 192.168.50.1
netmask 255.255.255.0
network 192.168.50.0
broadcast 192.168.50.255
gateway 192.168.50.1


# ETH1 is our Huawei HiLink dongle. The dongle allocates us an IP addr on this port
allow-hotplug eth1
iface eth1 inet dhcp


allow-hotplug wlan0
iface wlan0 inet manual
wpa-roam /etc/wpa_supplicant/wpa_supplicant.conf
iface default inet dhcp
And reboot.
If I'm honest, I'm not 100% sure of the all the implications of using "auto eth0" and/or "auto eth1" in the /etc/network/interfaces file ... but it doesn't seem to work as well (at all?) with the auto lines active, so they're either not present, or are commented out in my file. I'm also not entirely sure what "iface default inet dhcp" will do, and whether that might add any unwanted uncertainty.
Now set up IP forwarding... Open the /etc/sysctl.conf file
sudo nano /etc/sysctl.conf
and uncomment the line
net.ipv4.ip_forward=1
and then write the file and exit the editor.
Probably need to reboot (or at least restart networking) at this point. ( sudo /etc/init.d/networking restart )
Then, to configure the NAT routing tables, enter:
sudo iptables -t nat -A POSTROUTING -o eth1 -j MASQUERADE
To make this temporary change permanent, write the present (temporary) iptables configuration to a file
sudo sh -c "iptables-save > /etc/iptables.ipv4.nat"
Now we need to use a script to restore those tables when the Pi is booted. There's more than one way of doing this,
but an easy way is to add it into the end of the /etc/network/interfaces configuration file. Open the
file for editing:
sudo nano /etc/network/interfaces
And then at the end of the file, insert the line:
up iptables-restore < /etc/iptables.ipv4.nat
Save the file and exit the editor.
Reboot now, and your computer should then be able to access the internet via the Pi!


to be continued/tidied up... (May 2013) ...
Note to self: Ahhhh probably need to limit DHCP serving to eth0 to avoid problems, then can set to authoritative. Otherwise can get away with non-authorativite without limiting ports
These are things I'd like to do, but haven't yet
Would be better if we didn't have to sudo poweroff all the time. Suggested that if we made it a 'read only' installation, with no logging etc then it'd be safe to pull the power ad-hoc.
Comments/suggestions on this can be found at http://www.raspberrypi.org/phpBB3/viewtopic.php?f=29&t=22596 but I haven't tried this yet.
And at http://forum.stmlabs.com/showthread.php?tid=4671&pid=39864#pid39864
Might make it boot faster. I could then also make the SD-card image available for download - to give you a quicker-start!
http://www.cnx-software.com/2012/07/31/84-mb-minimal-raspbian-armhf-image-for-raspberry-pi/
I have some older (non-HiLink) dongles, and SIM cards for other networks. It'd be useful to support the older modems and/or to have a setup where the system would automatically use the second dongle/connection if the first suffered a hiccup. A true real-time load-balencing system would be nice, but I think (unfortunately, in the general case) this would require cooperation from a server elsewhere on the net to re-combine the pipes at the other end.
I'm not particularly interested in doing this as I'm happy to use the extra functionality of a fully fledged wireless/router, but you could put a USB WiFi device in the Pi and share the internet connection from the mobile-broadband dongle over WiFi. Others have done this - see hints at...

©2013 William Andrew Steer